Pages

Tuesday, August 25, 2015

Diecut Storage Idea with Close To My Heart Stamps

August's Stamp of the Month, Framed, is perfect for use with the NEW Artistry Cricut cartridge (ask me how you can earn it for 1/2 price). 
The Stamp of the Month has three frames and each has a coordinating image on the Artistry cartridge. 

Many times, I find myself working on a project and see how a stamped frame would add just that little bit of WOW. How about having a few pre-cut images within reaching distance.

Here is what I do -- a few cut in White Daisy and Colonial White stored in with the stamp. 

No stopping to cut, just pull one out and start stamping.

Just remember to cut a few more to take there place later.


And I am glad I had a few ready when working with my friend, Cindy, at her house.

Here is the front of the card boxes created for the United Way campaign auction at Cindy's office.

 The inside of the pink box contains cute Slate, Pixie, and White Daisy cards, a great gift idea.
And a little more masculine version with Desert Sand, Black and Colonial White, with a little black shimmer trim thrown in!

Click here to purchase your Artistry Cricut cartridge and you earn the August Stamp of the Month for $5 or

Click here to purchase the digital version of the Artistry Cricut cartridge and again, you earn the Stamp of the Month for only $5!!

Friday, August 21, 2015

Use Your Stash Poetic Journaling

August is National Poetic month and it reminded me of all the journaling pieces Mom and I collected over the years. It is time to use up those journaling spots that have been so neglected.

If you have come from Nicole's blog, you are on your way

A binder is what we stored our sayings. There are vellum titles and journaling, there are clear stickers, and many pages torn from many a magazine.


Using the Zoe Creative Insider guide (a great sketch option), Thistle Fundamentals (this pattern is retiring and a new one coming September 1st), Black and White Daisy cardstock. I used one stamp set
Snapshot Memories (D1648)

Now hop on over to see what Priscilla has in store for us!!

Shirley Ross - you are here

Friday, August 14, 2015

A Big Part of My Heart

Every time I watch this video my heart is so full because it reminds me of my littles (my grandbabies) especially my Emily, who is not so little now.


Life goes by so fast, littles grow up, parents grow older and it is great when we can hold on to our memories. If you are ready to Make It From Your Heart with Close To My Heart, please go to my website.

If you are ready start a new adventure by joining the Close To My Heart family, I would be more than happy to have you as a part of the Rockin' heARTs. Whether you want to get a great discount or want to see where you can go, you are welcome here! A great new consultant kit makes it even more FUN. New product in a wonderful new package (over $450 in product and business supplies) all for only $129.


Tuesday, August 11, 2015

Cricut Monday on Wednesday

I have been working with the new Artistry cartridge from Close To My Heart. Loving it!

The first fun project was a coffee cup card. I welded it to be a top opening card and uses slice to create the lid.


My second card is a jar card based on one shared by Jamie Holm, a fellow CTMH sister (who was inspired my Mandy Leahy), is shared next with a tutorial to follow - the tutorial is long so I will share the card first.

Bring in the jar, it comes in with flowers in the jar. You will need to ungroup and delete the flowers.

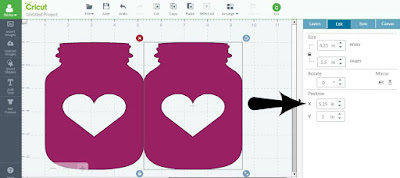
You will need to size the jar to 4.25" x 5.5".

Using the X and Y indicator place this first jar at 1 and 1.


Copy and paste two more jars, placing the one jar at X and Y of 5.25 and 1, which will put the two jars directly beside each other, touching enough to use the weld option.

Select the first jar and mirror it horizontally so that when the card is closed the two jars will line up.

Select the second jar and click on Contour under Layers and click on the heart making the line around the heart turn to blue.

Select both jars and click on the Weld option under Layers.

Your card has been created.


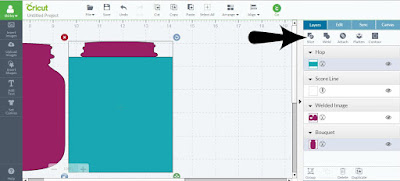
Select the FREE score line from Insert Shapes (1); place it at between the jars, you can use the X and Y indicator to place it directly between the two (2); select both jars and the score line, you know they are selected if they are both grayed on the Layer section (3); click on Attach to attach the score line to the card.

Bring in a rectangle, ungroup if you are using one from the Artistry cartridge and delete the top layer.

Using the third jar and the rectangle, place it under the lid and size it until it covers the part of the jar you wish to remove.


Click on Slice, move the other parts away and delete all parts leaving only the lid shape.


 Here is the finished card with lid and an extra heart, will share how I made that in a later post. I hope this helps you give the weld and slice a try.

I love when you leave a comment!


Thursday, August 6, 2015

FUNdamentals and Friend Tree (sneak peek)

Another card for an upcoming card class using the FUNdamental paper packet.

The card uses Canary FUNdamental which has a white and canary chevron pattern on one side and a clear embossed chevron look on the other side.

Using the NEW stamp set Friend Tree as a little sneak peek (will be available September 1st) into the upcoming 2015-16 Annual Inspiration catalog.

Slate ink and silver shimmer trim add a little softening to brightness of the canary.

And the card is finished with some of the grey opaques, which are retired BUT there are some great new embellishments coming September 1st!

My wish is that  you enjoy my creative endeavor and I would love you to leave a comment.

Thank you!
Whimsy Fundamentals Z2033

Wednesday, August 5, 2015

Random Stamping Revisited

My first real adventure into stamping was learning how to create pattern paper with stamps and ink. If you have stamps and ink, you will always have the perfect coordinating pattern paper.

A new class, Coffee and Cards, was held at a local coffee shop. Each guest created their own pattern paper using the Pretty Petals (C1599) and Doodled Design (A1170) stamp sets and White Daisy cardstock.

Starting with the largest image from the Pretty Petals, randomly stamp starting in one corner and moving down and across the page. You need to make a visual triangle with the large stamp image.

Now stamp the smaller flower (Honey ink), the leaf (Sweet Leaf ink), from the Pretty Petals stamp set, and the heart and the three dot cluster (Slate ink) found on the stamp Doodled Design.

Keep the images close and you can even overlap. This large piece will soon be cut into 12 cards.
A1170 Doodled Design
C1599 Pretty Petals

We created 12 cards using three Make It From Your Heart Volume 2. Just like a cookbook, this wonderful how-to book, will walk you through a delicious crafting recipe.


See how stamping the images close together, gives you a great visual on your card.

I hope you enjoyed, I love to hear from you so please leave a comment.

Here is the link to the Design Space file for these pretty flowers from the Pretty Petals stamp set and more.


Monday, August 3, 2015

Monday Morning Cricut Fun

A little Monday morning fun with the new Close To My Heart Cricut cartridge, Artistry! This cartridge comes with a full pack of our new Enchantment cardstock full of colors like peacock, eggplant, fern and more (be the first on your block to have it) and you can purchase it DIGITALLY!! Oh what fun for us Explore lovers!!

Well, enough of that and on to some fun. Our Stamp of the Month, Framed, is the perfect subject for using the Artistry cartridge, BUT the carrier sheet does not give us any clue as to shape sizes so let me share with you how to figure this out.

If you find a stamp set that seems to share a coordinating shape, put the stamp on your Versamat (if you don't have this wonderful mat, use a ruler or something to measure the size by) and write down the height and width.

Here you can see that the shape measures 1 1/4 x 2 1/2. For Design Space and Cricut Craft Room users this is pretty easy as you may adjust both the height and width. For Expression and Expression 2, I would try using the height and see if it will adjust correctly. 


For Explore users, I like to search by cartridge, so click on Cartridge, type in the search bar the cartridge you are looking for which is Artistry and then scroll down. This shape is part of a layer, so look for the shape. 

You may want to ungroup and delete the overlay and only size the shape. I keep a Design Space file for all stamps with a coordinating shape for easy access. Click here for the link to the Framed Design Space file.

And one more card using the Zoe Creative Insider (it is great to be a Close To My Heart consultant and have so many resources at our fingertips -- ask me how you can get a brand NEW consultant kit and the Creative Insider) and the Framed Stamp of the Month.


Sunday, August 2, 2015

Easy Like Sunday Morning

This new adventure comes with some major changes. Meals with Mom were pretty routine. Our meals had to have a meat, starch, and she loved her dessert.

Well, living alone brings on a new idea of meals. Most of the time, I have to remind myself it is time to eat. Breakfast may be at 9 am and lunch maybe at 2 pm and, well, you get the picture.

And if I had to think about and fix a meal, let us just say there were many meals of scrabbled eggs, quick easy.

My daughter, Angela, shared with me some of her freezer meal blogs, which got me to doing some searches for more information. And yesterday, I spent my first once a month cooking day. There were mini meatloafs, spaghetti sauce, sloppy joes, beef and chicken for tacos and chicken for salads. I also have a little bit of a sweet tooth, so there are oatmeal/raisin cookie dough and chocolate chip cookie dough in the freezer, too! Pop out 3 or 4 cookies, place them on the cookie sheet and in 10 to 12 minutes there are warm cookies ready to eat.

Not all the meals are frozen with all the ingredient. Spaghetti sauce is frozen so I only have to cook the noodles and I have found salting the water brings it to a boil faster and using the timer, 12 minutes cooks the best boxed pasta.

I have chicken and frozen mixed vegetables and frozen chicken broth and frozen biscuits. All I need to make is a little white sauce using the chicken broth, add the chicken and a handful of mixed vegetables and white sauce to a large ramekin top it with a biscuit and pop it in the oven to create a chicken pot pie.

The ideas are endless but your time is not, so here are a few blogs I liked when I was doing my research - oh and did I mention how much I saved, that was the best part.

The Pioneer Woman
The Happy Money Saver
In the Kitchen

Saturday, August 1, 2015

Framed (S1508) August Stamp of the Month

Welcome to my new adventure as the Rockin' HeART stamper. I am happiest when I am getting inky creating projects to share with my crafty friends.

Here are a few cards created showcasing the August Close To My Heart Stamp of the Month, Framed (S1508). This stamp set coordinates with our NEW Artistry Cricut cartridge and the cool thing, Artistry can be purchased NOW as a cartridge or a download. More on this later today!!


Using the Zoe colors (a sneak peek paper suite available in August), Glacier, Sweet Leaf, Sorbet, and Canary in our Paper Fundamentals, here are three cards using our wonderful Creative Insider workshop. 

Fundamentals have a pattern with a neutral on one side and the same pattern tone on tone embossed on the other. The Fundamentals used in these cards will be retiring September 1st, you better get yours before they are gone. They come in a combo pack based on one of Close To My Heart color groups.

First card showcases the neutral with color pattern side. 

 To make the card pop, the inside has a glacier matted sentiment piece stamped with the stamp set, Finding the Words (D1646).

Second card uses the tone on tone side and last card uses the scraps from the first two flagged on the ends.

Silver Shimmer Trim and retired gray pearls are all the embellishments added.

Frames were stamped in Whisper and sentiment in Slate.


Design Space Friday - Creating a Unique Background

  It is fun to create your own unique background paper using you Design Space and a few images.